Showing posts with label handicraft. Show all posts

Sunday, January 2, 2011

Project: Carapace - Day 4: Settling into the swing of things

Day 4: Settling into the Swing of Things

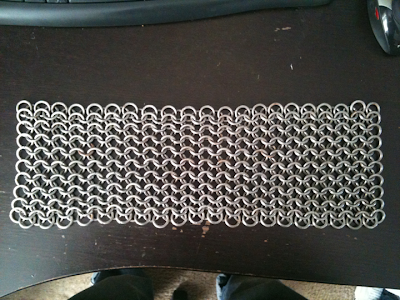
Chainmaille progression was virtually nil today. Tweaked a few things to ensure that rings were butted tightly and that the pattern was even on the piece that I am calling "Front Yoke". I got about 55 rings into "Rear Yoke" before setting it down to work on leather. I'm finding that if I work on one thing for too long, the muscles I'm using for that particular task get extremely sore and then work over the next few days is painful.

I started punching holes in my lamellar plates in earnest today. Brent and I had already marked all the plates with the hole pattern, and I bought a 5/32" round hammer punch at Tandy to make the holes. It's a little bigger than Brent's 9/64" punch, but the visual difference should be invisible once everything is dyed and starts getting laced together.
About 20 plates in (read: 160 holes punched), I started noticing this black grit all over the table and my pieces. A little investigation revealed that it was bits of the 1-pound rubber mallet I was using in conjunction with my punch. Each strike was ripping off bits of rubber, and each hole took between 4 and 6 strikes to make, so the mallet was quickly disintegrating.
I went to Mall-Wart to pick up a polyurethane-headed mallet like Brent got from Tandy, but no such luck. All the soulless mega-mart had were more rubber mallets. On the way back home, I drove by an AutoZone and thought, "They have mallets at auto parts stores, maybe they have non-rubber ones!" And I was so right. There in the tool section was a one-piece, cast urethane dead-blow hammer, a lovely 2 pounds with steel shot in the head to add force and reduce recoil vibration. It was a little pricey at $13, but it looked like just what I needed, so I was willing to drop the dough.
I got back to the house with the mallet and tried it out, checking after each hole for marring of the striking surface or any signs that the mallet wasn't going to last. But I shouldn't have even worried, because aside from some extremely minor indentations, the mallet still looked new after punching another 20 pieces. Now keep in mind, the rubber mallet wasn't brand new, but it was in almost-pristine condition when I started. Here's a comparison of the two mallets after they each punched 160 holes:
The angle of the photograph actually hides some of the damage, because the rubber mallet (on the left) is actually indented over an 1/8" of an inch into the surface, but the dead-blow mallet has barely any marks.
Another benefit of the new mallet is that at double the weight and with a harder striking face to transfer more force into the punch, each hole takes 1 or maybe 2 (on the thickest plates) strikes to punch the hole, cutting down my time spent on each piece. With the rubber mallet, it was taking at least 90 seconds to punch each plate, now I'm creating all 8 holes in 30 to 45 seconds, and there's less repetitive motion strain on my wrist and elbow.
So with some anime playing on TV to keep me interested, I got down to work, setting up a rhythm to keep everything flowing nicely and at about midnight-30, I had a nice block of 100 plates fully punched and ready to dye tomorrow.
The plan tomorrow is to set up an assembly line of sorts. Brent and I will finish punching the other 200 cut plates, then design, mark and cut the pair panels for the shoulder straps as well as the 6 to 8 belts for the side closure.
After those are cut and punched, we will start the dye process. In a large bowl, we'll start submerging sets of 10 or so punched plates into the dye/water solution. I want to get a mottled effect on the armor, so once each set is submerged, pieces will be individually removed and excess dye dried off before the next piece is pulled from the dye bath, so the pieces from each set which are pulled out first will be lighter than the last pieces to be removed. There will be no purposeful pattern to the assembly of the pieces based on color, once they've been dyed they'll all just be thrown in a bag and selected one at a time at random to be added to the armor. The random selection will create a nice mottled effect to the finished vest. The shoulder straps and closure belts will be more traditionally dyed, using a foam brush, as I'm not too worried about their coloration.
Once dying is complete, we will start oiling each piece with neatsfoot oil and and begin lacing them together using suede cord, likewise oiled. I think the best method will be to oil each piece as it is selected for lacing, that way there is no confusion about which have been oiled or not.

Friday, December 31, 2010

Project: Carapace - Days 2 and 3

Day 2: Chainmaille and Lamellar

I didn't manage to get much done with the mail today, working on expanding the piece I have was frustrating, as it didn't look like I was doing anything after an hour of work, but I actually ended up doubling the size of the piece.
I put the mail aside and went over to Brent's place to work on the other armor project, Leather Lamellar in a style found during archaeological excavations in Visby, Sweden.

My main holiday gift from my parents, other than the 9-button boots they bought me at TRF, was a gift card to Tandy Leather Factory, which I used to purchase a whole saddle skirting hide, which for those not super-knowledgeable about leather, is approximately 20 square feet of cow hide, at between 12 to 16 ounces thickness.
The weight of leather assumes that a square foot of 1/64" thick leather weighs 1 ounce, so the saddle skirting I purchased is between 3/16" and 1/4" thick.
In the picture above my hide has had about 1/3 of its square footage cut into the pieces for the lamellar using a strip cutter set to 1 1/4" width. After each strip is cut off the hide, it is measured into about twelve 3" pieces and cut, creating the individual plates with only about 1" of waste per strip.

Day 3: Things begin to take shape

Back to work on the chainmaille, I started to form the shoulder straps, a pair of 16 ring x 16 ring squares on either side of one of the long edges of my main rectangle.
The plan is to duplicate above piece, then attach the duplicate to the original at the 16x16s to form a neck hole, shoulders and the beginnings of the chest and back. Next the edge that is on top in the photo will be extended, then widened in a T shape. The arms of the T on the front side will be attached to the T on the back, forming armholes and creating basically a very short vest. From that point, sleeves can be created, and the "hem" of the vest can continually be extended downward until it reaches the desired length, or I run out of rings.
My 5am math says that I've used 1492 links so far, which is scary, because that represents a little over 1/5 of my total rings, and also represents about 6.8 pounds. I can tell you that hefting it one-handed certainly doesn't feel like almost 7 pounds, so maybe I'm just exhausted and adding poorly. The real concern is that if this is 1500 rings, then the duplicate will bring it up to 3000 rings...wait a minute, I am completely wrong here. I've only used 746 rings. That means weight for this is only 3.4 pounds, which feels a lot more correct, and is only an expenditure of about 1/8 of my rings.
So, ~750 rings for the front, means ~1500 for the whole yoke, another ~1200 for the T extension, bringing the total to ~2700 for the mini-vest, a little over 1/2 of my total rings. If each sleeve is about the size of my 1/2-yoke, thats another ~1000 rings for each sleeve, bringing the total to ~4700 rings or about 93% of my rings, with a shirt that only hangs to just under my sternum.
Looks like I'm going to need to buy more rings in any case, even with my most frugal estimates of ring usage, which brings up my other concern: Ring Lord has stated that they will be discontinuing the 12ga rings when their stock is gone, which means I need to buy up their remaining 15 pounds before someone else does, but I'm not sure where the money for it is going to come from, because I certainly don't have the tools or means to coil and cut 12ga steel here at the apartment.

Back to leather this evening at Brent's, we had already cut 25 strips from the hide, creating about 300 individual plates, which were then marked with the "Visby" hole pattern, as shown below.
Of the the pieces, from left to right three different hole methods were used: Drilling with a 9/64" from the rough side (back) to the smooth side (front), drilling from front to back, and using a 9/64" hammer punch from back to front.
None of the methods produced satisfactory results, as drilling from front to back causes the ugly shredding of the leather seen in piece #2, and hammer punching from back to front causes the unfortunate puckering seen in piece #3. The old tried-and-true method of front-to-back hammer punching will produce the best results, and will not be significantly slower than drilling.
Using the test-punched pieces as templates, we marked all 300 pieces with the Visby pattern, and will begin to punch them in the next step.
That's all 300 pieces marked and ready for punching. To speed up the punching process, I will go to Tandy tomorrow and pick up my own punch set.
A quick test-threading of the pieces we punched/drilled brought up an interesting issue we hadn't considered with the rectangular pieces. Of the lamellar found in Visby, the pieces were lozenge-shaped, not pure rectangles.
When we threaded the three leather pieces together using the middle holes, the top and bottom holes of pieces 2 and 3 were obscured by the edges of pieces 1 and 2, respectively, explaining why the Visby pieces have the curved edges. While I'm not about to go back and trim 300 plates to give them rounded edges like the "Standard Piece" above, Brent commented that we could either use a hammer chisel for making belt ends to make them look like the "Centre Piece", or just punch the middle 4 holes closer to the edge of each piece than currently marked. I think I might try to do a bit of both, and look for a tool at Tandy that would do the job (a hammer chisel with a 4" gradual curve would be perfect), or borrow some fucking shears from Blue and just cut the pieces manually. *winces* Either way, it's going to be a shit job, and we're not even to the dying yet...

Wednesday, December 29, 2010

Project: Carapace - Day 1

I never update this as I should, but with a major project underway now, I'm making a commitment to update this every day I do any significant amount of work on it.

Day 1: Chainmaille
One of my holiday presents from my in-laws was surprisingly heavy as it was laid in my lap. I had my eyes closed as instructed, so when the 23 pounds of steel was deposited there, it was a pleasant shock.
The rings were fabricated and cut by the good folks at The Ring Lord, and are 12-gauge mild steel wire, wound to 1/2" inner diameter, for an aspect ratio of about 5, perfect for making sturdy, but not stiff, European 4-in-1 mail.
By the measurements of The Ring Lord, there are ~720 rings per square foot of finished material using the 4-in-1 pattern, but I believe that was measured with the material in it's most compact form, as I am about 300 rings in at this point, and have a piece that is 20"x3.5" when fully expanded, which is how it will be when worn, so I'm estimating more like 600 rings per square foot.
Nevertheless, some rough measurements on my own body with a tape measure says I'll need a 3'x2' panel for chest and another for back, and then a pair of 1'x2' panels for sleeves, for a total of about 16 square feet of material for the finished piece, minus the links missing for a head hole, so about 9600 rings.
My gift of 23 pounds gets me an estimated 5000 rings, so I'll probably be purchasing another 10 pounds at least, but only after I finish using these that I have and see where I am.